Your Miele broke down?Thousands of Miele washing machines are prematurely replaced on a yearly basis. Bad for your wallet and for the environment. Reed further to discover that it may not be necessary at all to replace you washing machine. Does any of the following situations apply?Shortly after starting any program, motor starts at full speed (squeaking sound). Drum doesn't spin or spins irregularly, rinse LED flashes, three dashes in display (if present) After starting a program, it stops temporarily, to spontaneously continue after a while Machine dead, no sign of life, no lights, PCB has been repaired by a technician, but broke down again after a seemingly successful repair.
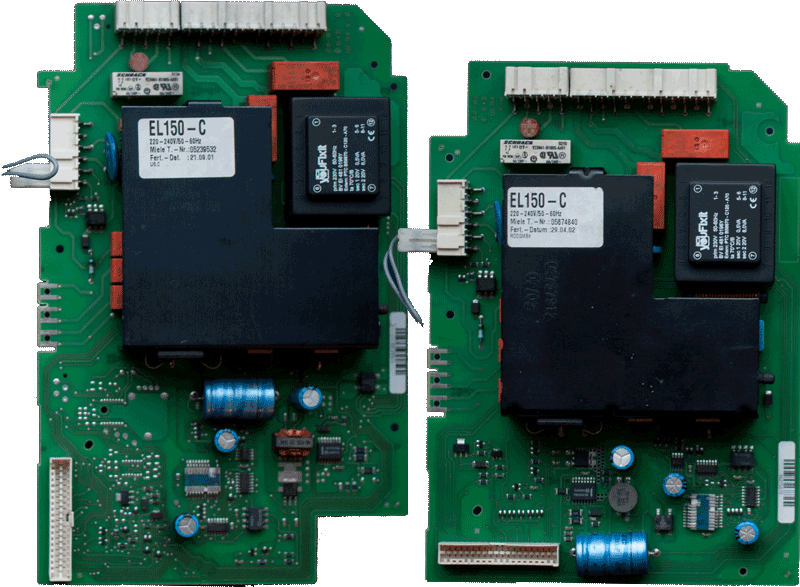
Different causesMiele machines with an EL150 electronic, generally are very reliable. There's only one flaw: the electronic breaks down prematurely. Complaints may start as soon as the age of your machine is about 10 years. First off all it has to be noted, that worn brushes are the number one cause of the drum not turning anymore. So if this is the case and also LED "Rinse" flashes and three dashes appear in the display (if present), check the carbon brushes first. If these are okay, most probably, the PCB is faulty. There are three main causes for a faulty PCB: Transformer (broken primary winding) Transformer (shortcut in secondary winding) IGBT shortcut (Insulated Gate Bipolair Transistor) or Power MOSFET)
Primary winding broken: The symptoms often start intermittently. Suddenly the machine stops and seems switched off for a while. After a while it either spontaneously continues the program, or ends the program in error (dashes in display, LEDs flashing, beeping). Only a few washes later, your machine may give up altogether and is completely dead. secondary winding shortcut: Drum doesn't spin or turn at all, rinse LED flashes, three dashes in display (if present), beeping sound. IGBT sortcut: Shortly after starting any program, motor starts at full speed (squeaking sound). Then same symptoms like pervious cause 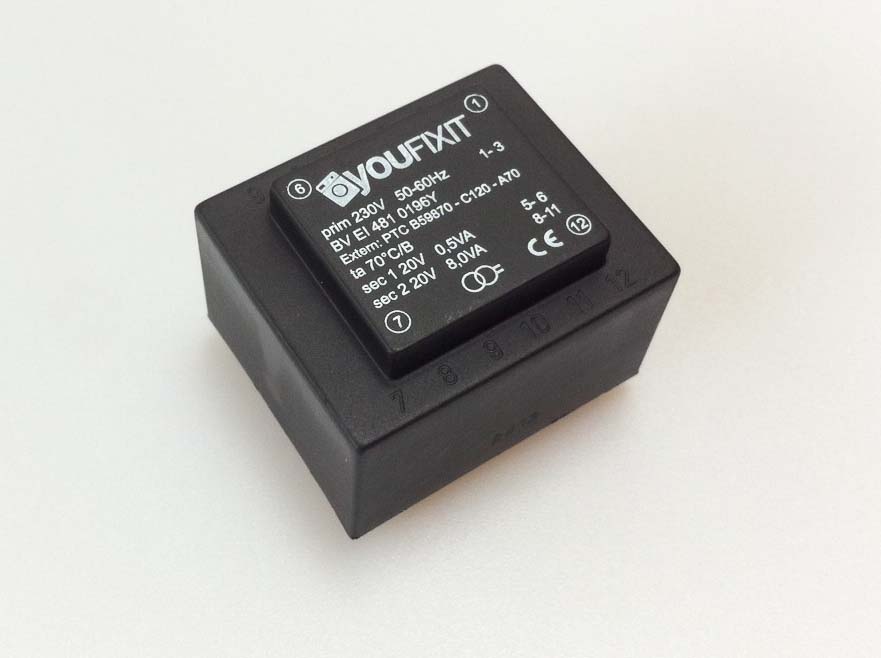 | Transformer on main board A defective transformer is a recurring problem in several Miele models. The first models that were affected were the ones with an EL001 PCB mounted and which were built from 1990 on. Earlier EL001 modules were not affected. De defect appeared only after about 15 years. However not completely in line with customers expectations, there weren't many complaints. The transformer that's mounted in the EL140 and EL150 boards however, broke down already after eight years. The transformers we use, are not the original Miele's, but are from our own YouFixit brand. (See home_brand for all info about this transformer). |
Power managementOne of the most important components on the power management circuitry on the EL150 electronic is the IGBT (insulated gate bipolair transistor). Although this actually is a transistor, many call it a Triac. It is the part with three pins, attached to the heat sink. If the resistance between the outer legs is only a few ohms, then it is definitely broken. If it is, the motor immediately starts at full power, right after switching the machine on, making a squeaking sound. Within a second, the machine stops in error mode (three dashes in display). Alternative causes?If your Miele's spinning or rinsing is problematic, then the motor drive is faulty. Next to the above mentioned causes, there are other possibilities: Worn carbon brushes, see here. Carbon brushes of a Miele have an exceptionally long lifetime. Unless you use your machine very intensively, they may last 15-20 years. Cable breach or bad contact. Mainly in older models. Motor defect. Symptom: one brush is worn down completely, while the other still has enough length to last for years. Also the motor does not seem to have enough power. Sometimes seems to operate well with an empty drum.
Repair adviceNaturally, you can arrange for a Miele service technician to visit you.
He will replace the main circuit board. Because the machine is at least eight years old (you can find the production date on the label of the PCB), Miele will not accept any compensation. The price of print replacement is approximately €350 (+ call-out fee).
The new print will last approximately as long as the old one.
You can also ask your local white goods dealer for a diagnosis.
The call-out fee may be lower. The price of a new PCB will not.
Several white goods mechanics have now also found their way to us, so they can also offer you a repair of the main circuit board instead of replacing it with a new one.
In that case, do ask about the guarantee conditions. Mechanics who have the PCB repaired by us are entitled to a one-year guarantee on the costs of repairing the PCB (the one-year guarantee does not have to apply to the mechanic's labour).
You can of course also have the PCB repaired directly by us.
Send it to us and pay the repair and shipping costs in advance to our bank account.
In most cases the print-out will be repaired within three working days, depending on the speed of the postal service. Complete overhaulIf you take advantage of our offer for a complete overhaul (see below), you will save a lot of money and you will be sure that the PCB will not show any defects in the coming years.
We will not only replace the defective component, but also prevent it from breaking down again or causing another defect to the PCB. Repair it yourself? TranformerFor customers who have sufficient experience in desoldering and soldering on a double-sided PCB, we also offer the original transformer from Hahn for this PCB.
Since mid-September 2012, Miele Germany has decided to strictly abide by the agreement it has with the Hahn company.
As a result, this transformer is no longer available in the free trade.
We understand this action by Miele Germany (which the head office has explained to us in detail).
However, after weeks of testing, we can offer an alternative to this transformer that is at least of the same quality.
This transformer is produced in the Netherlands on behalf of YouFixit and we therefore sell it under our own brand. Of course, replacing the transformer yourself is done at your own risk. I cannot give any guarantee in this case because I have no control or influence on your workmanship.
Unfortunately, we are often faced with failed attempts where the PCB is so damaged that it has to be restored by us (the costs of which vary).
A common consequence is that the bushings connecting the two layers of the PCB are pulled along when dismantling the transformer. IGBTReplacing the IGBT yourself often ends in disappointment. This is the reason why we no longer offer this part separately.
It happens too often that the IGBT breaks down again after a few washes (or sometimes after a few months). Our offer: complete overhaulSince both of the above-mentioned defects occur approximately equally frequently, we recommend that you deal with both causes in the event of a defective PCB.
For this purpose, we offer a complete revision for the modules EL140-A, EL150-B, EL150-C and EL150-D.
What do we do during a complete overhaul? Replacing the transformer Replacing the IGBT Replace any weak components that are responsible for the failure of the IGBT Check other components such as relays, electrolytics, etc. Replace any other defective components Checking the printed circuit board for corrosion and restoring it if necessary, sealing any weak/restored spots with a special lacquer Cleaning the PCB Testing the PCB Full 1-year warranty on all electronic faults on the PCB (except lightning, water and fire damage). In case of a new or recurring defect within one year, you only pay the costs for shipping the print to us.
What type numbers are involved?The following Miele models have an EL140 or EL150 module: BRILLIANT 1263 WPS | SENATOR | W149 | W3546 | W381 | W457(S) | W934 | BRILLIANT 1550 | SENATOR 160 WPS | W150 | W355 | W383 | W459(S) | W937 | BRILLIANT 1600 | SENATOR 165 WPS | WT150 | W357 | W387 | W460(S) | W935 | BRILLIANT 2200 | SENATOR 220 | W151 | W360 | W430(S) | W461(S) | W939 | | SENATOR WT150 | W155 | W361 | W433(S) | W463(S) | W941 | METEOR 1052 WPS | SENATOR 1677 | W2573 | W3616 | W435(S) | W467(S) | W946 | METEOR 1063 WPS | SUPERIOR 1600 | W2585 | W362 | W437(S) | W470(S) | W946(i) | METEOR 1149 | SUPERIOR 1620 WPS | W300 | W363 | W439(S) | W471(S) | W980 | METEOR 2086 WPS | SUPERIOR 1650 | W3160 | W367 | W443(S) | W473(S) | W985 | METEOR 2340 | SUPERIOR 1663 WPS | W3345 | W370 | W444(S) | W475(S) | W986 | | SUPERIOR 1677 WPS | W3460 | W373 | W450(S) | W476(S) | W987 | MONDIA 1285 WPS | SUPERIOR 2100 | W351 | W374 | W451(S) | W477(S) | W989 | MONDIA 1363 WPS | SUPERIOR 2101 | W352 | W375 | W452(S) | W479(S) | W989(i) | MONDIA 1823 WCS | SUPERIOR 2200 | W353 | W376 | W453(S) | W489(S) | WT945 | MONDIA 1825 WPS | SUPERIOR DUO 1500 | W3545 | W377 | W455(S) | W489(Si) | W145(S) |
Modules: EL140-A, EL150, EL150-A, EL150-B, EL150-C EL150-D Your advantageHighly professional repairs Low prices What you can do, you do yourself Very fast service (see Comments) Your machine can last for years
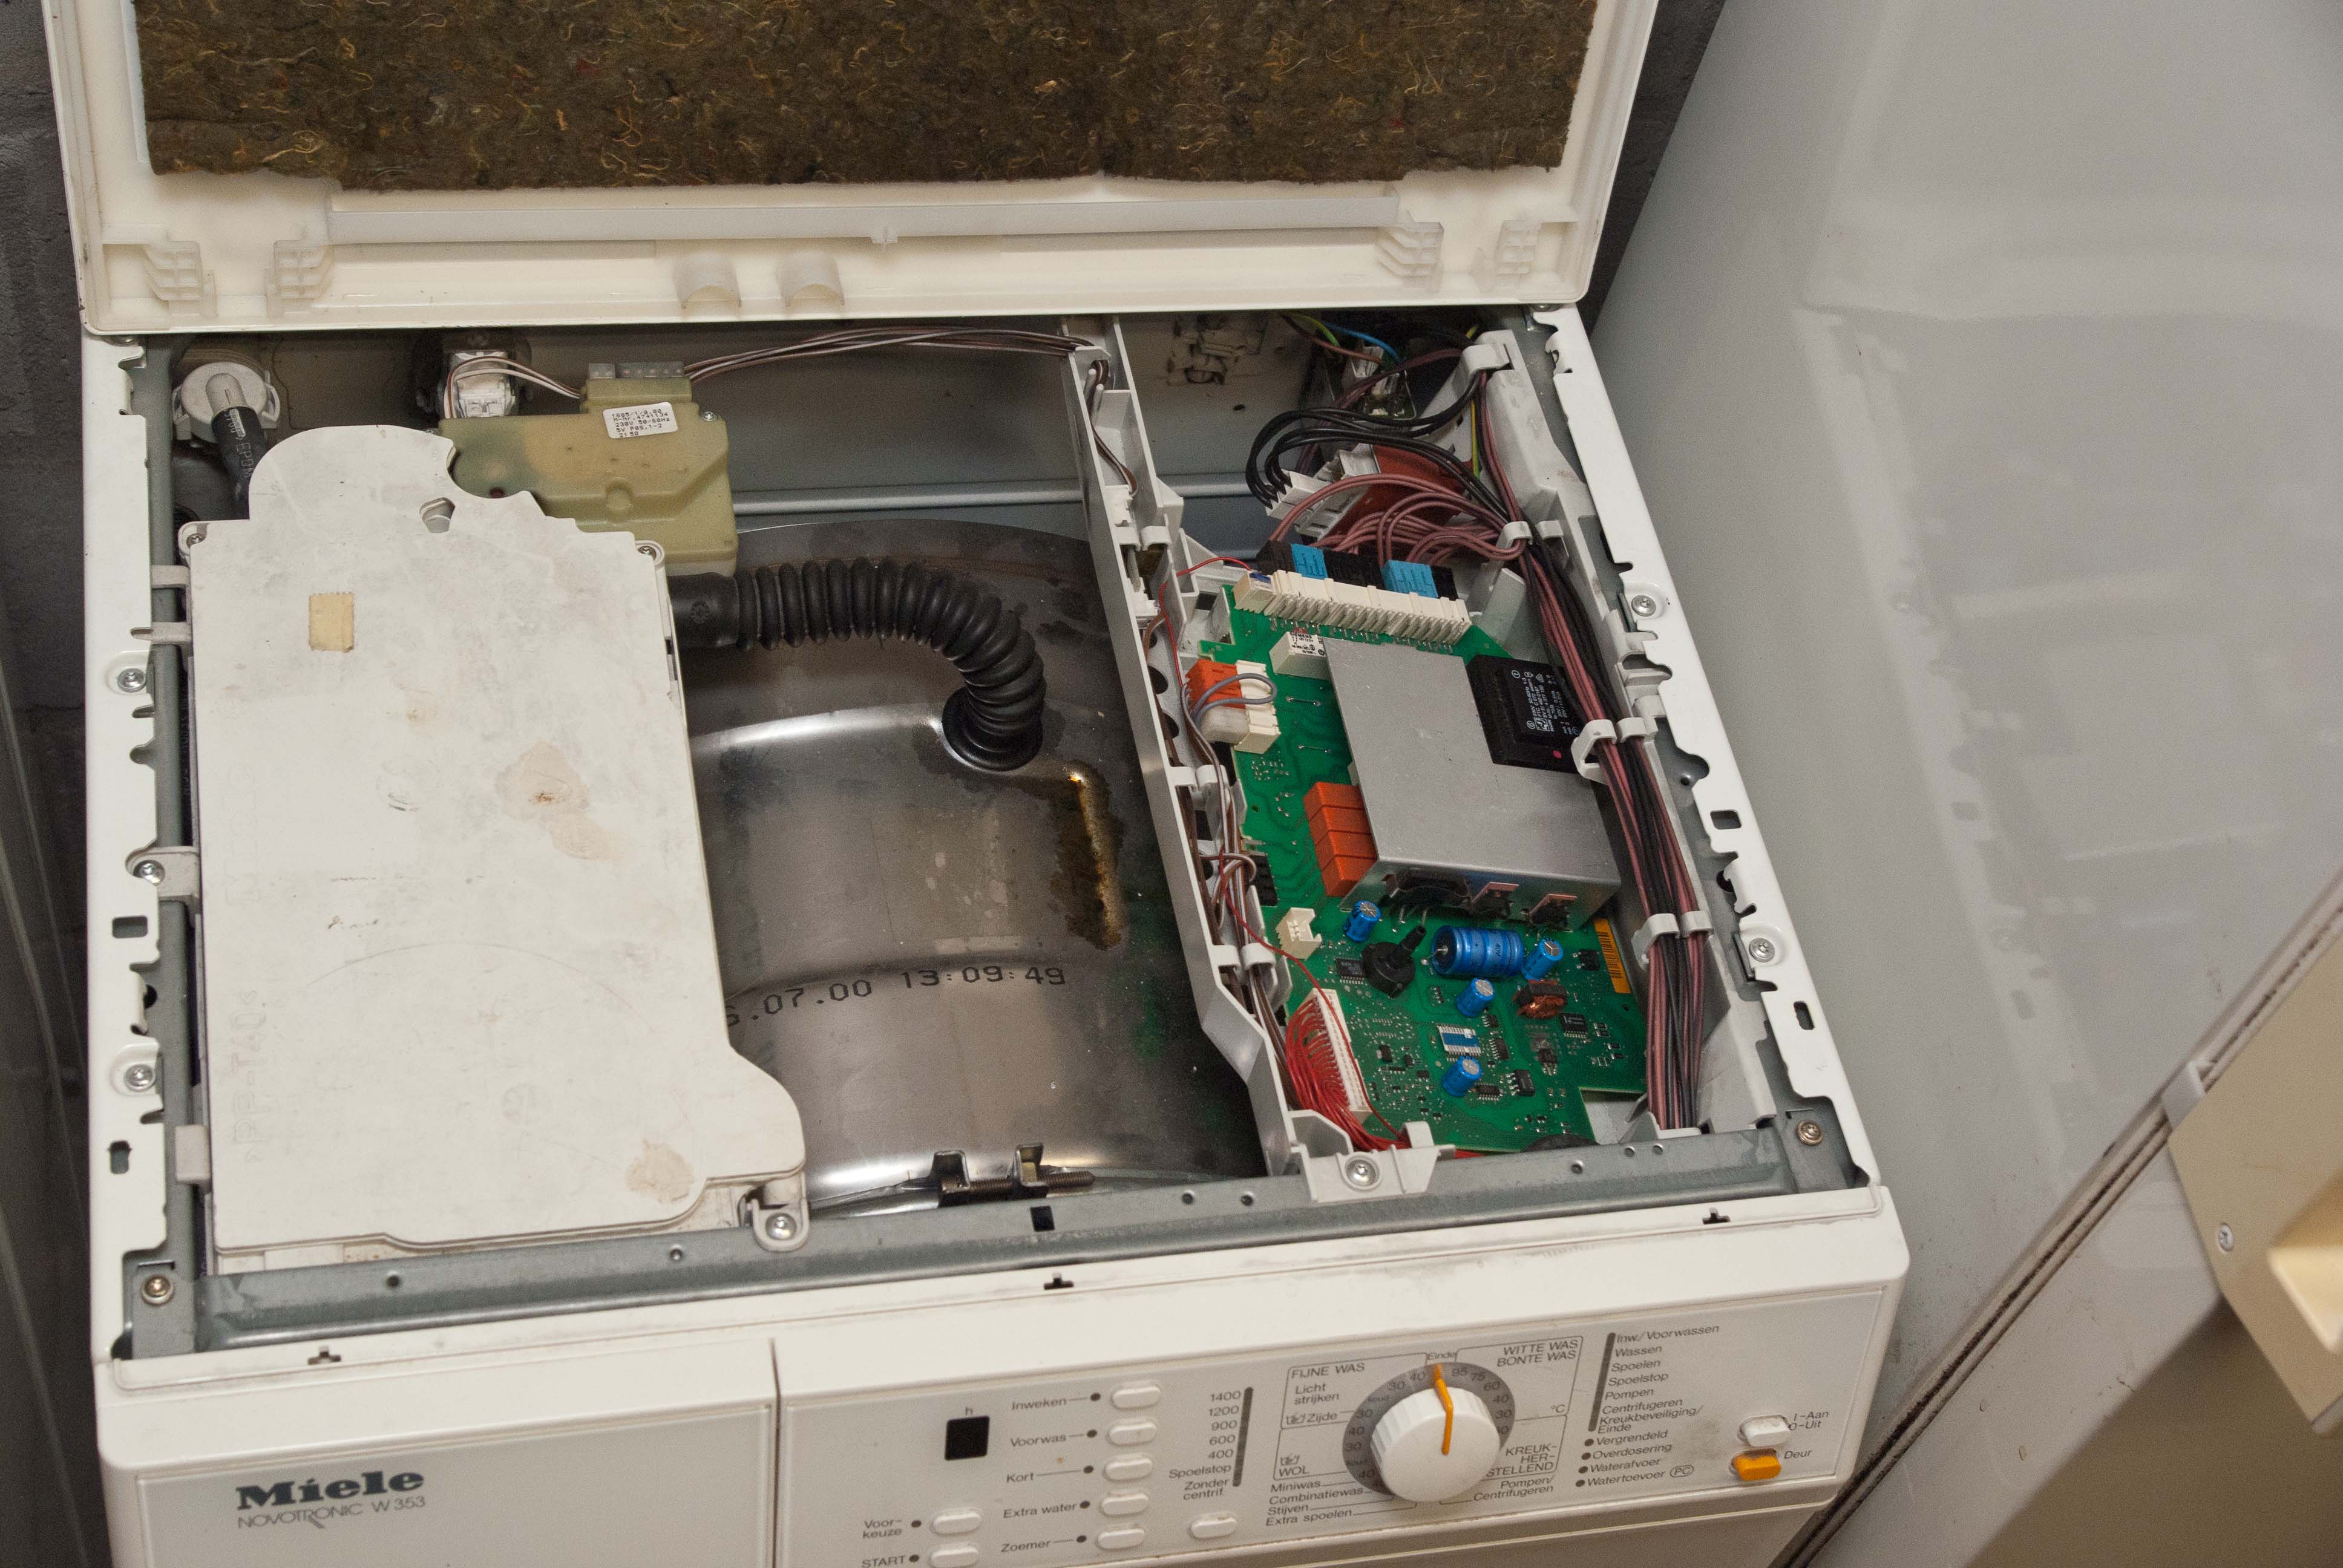
Where can you find the model number of your Miele?The model number (usually the letter W followed by three digits, sometimes four) can be found on the type plate behind the door. How to disassemble the PCB - (front loader, type 1) Pull the plug out of the wall socket
Open the front panel (bolts in door opening, screws behind soapbox)
Printed circuit board is mounted against the inside of the front panel, at the bottom (Photo)
Disconnect all plugs from the main PCB and take the main PCB out of the machine.
- (front loader, type 2) Pull the plug out of the wall socket Remove (e.g. with a table knife) the two plastic covers on both sides of the top plate Remove the two screws Fold up the top plate at the front and turn it away to the back You can now see the print at the top of the machine (Photo) Disconnect all connectors from the main PCB and remove the main PCB from the machine.
Be extra careful with the white (jumper) plug next to the orange plug. This is not connected to a cable in machines without WPS! Remove it first and keep it in a safe place to prevent it from falling into the machine (do not send the loose plug along)
- (top loader) Pull the plug out of the wall socket Remove the knobs from the control panel (pull) Insert a table knife between the top edge of the semi-transparent cover plate of the control panel and the top edge of the control panel, starting at the left. Use the knife to pry the cover plate away from under the edge and work your way to the right Remove the cover plate Remove the two screws from the control panel. Flip the control panel forwards. You can now see the main circuit board Disconnect all the plugs from the main circuit board and remove the main circuit board from the machine
How does it work?ConsumerContact a white goods specialist to repair your electronics. Most home appliance specialists in the Netherlands and other EU countries know how to find YouFixit (and if not, they can register with us via our general email address). White goods specialistIf you are not yet a YouFixit customer, you can register with us via our general email address, stating your Chamber of Commerce number and other details about your company. We will then send you our general terms and conditions and price list and ask you to complete the missing data and agree to our terms and conditions. | 